Designer for .NET Core / .NET 5 and Higher
Important
This topic is about working with .NET Core or .NET 5 and higher. See the Designer for .NET Framework topic for working with .NET Framework.
The Bars controls are fully customized in a standalone dialog which enables easy interaction with toolbars, menus, and commands.
To get started working with a new bar layout, please follow the steps in this topic.
Note
See the Visual Studio Designer topic for details and requirements for designer functionality.
Add a BarManager
Menubars, dockable toolbars, popup menus, and (optionally) standalone toolbars are all managed by a BarManager.
The first step in creating a bar layout is to add a BarManager component to your Form.
Set the HostContainerControl
Before any docking of toolbars can take place, a host container control must be set on the BarManager.
- In Visual Studio, select the BarManager component.
- In the Properties window, set HostContainerControl property to the control that should become the host container control. Typically, this is your
Form.
After a HostContainerControl has been set, four BarDockArea controls are added as children of the host container control, one docked to each side.
Important
The BarDockArea controls should never be removed manually in the Visual Studio designer.
Tip
To change to a different host container control and reparent the dock areas to another control, simply set the HostContainerControl property to another control. To remove the dock areas completely, set the HostContainerControl property to null.
Start Customize Mode
To customize BarManager in the Visual Studio designer, the design-time customize mode must be started.
To start customize mode:
- In the Visual Studio designer, right-click on the BarManager component to open a context menu.
- Select Customize... from the context menu.
This starts the design-time customize mode and opens the Customize dialog. BarManager will remain in customize mode until the Customize dialog is closed.
Create Commands
The next step for a new bar layout is to create the commands. All commands require a Category and a Name, and these values are combined to create a unique FullName for the command. For example, clipboard commands with a category of "Edit" might be given a FullName of "Edit.Cut", "Edit.Copy", and "Edit.Paste".

To create a command:
- If not already open, start customize mode to open the Customize dialog.
- In the Customize dialog, select the Commands tab.
- Click the New... button to display the New Bar Command dialog.

- Select an existing Category or enter a new category for the command, e.g., File, Edit, or View.
- Enter the Command Text to be displayed in menus and toolbars.
- Verify the Command Name, which is automatically generated from the Command Text, or enter a custom value as desired. This value will be combined with given Category to create the FullName of the command.
- Select the Command Type for the new command. See the Commands Overview topic for more information on different command types.
- Click Add to create the new command. The New Bar Command dialog will reset to default values.
- Repeat the steps above to create any additional commands, then click Close to return to the Customize dialog.
Tip
To get set up quickly, click the Create Standard button. This feature immediately adds several of the most common commands to the BarManager and is a real time-saver for most applications.
Create Bar Controls
With commands defined, bar controls are ready to be created and populated with command links. The Customize dialog can be used to create menubars, dockable toolbars, and popup menus.
Create a MenuBar
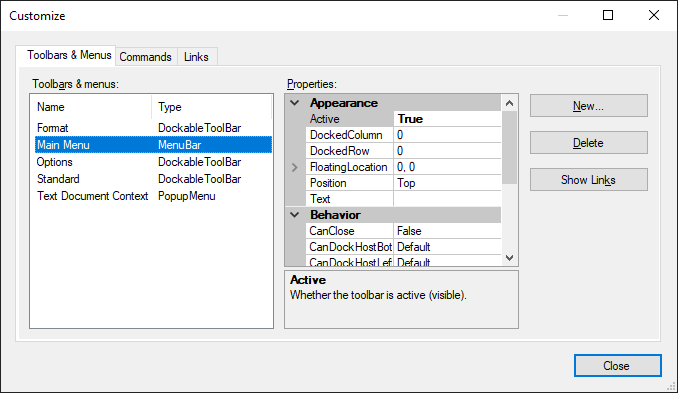
To create a MenuBar:
- If not already open, start customize mode to open the Customize dialog.
- Select the Toolbars & Menus tab.
- Click the New... button to display the New Bar Control dialog.
- Enter a Name for the new control, e.g., Main Menu.
- Select MenuBar for the Bar control type.
- Click OK.
The menubar should now be visible in the designer, but it has no command links in it.
Tip
If the MenuBar control type is disabled on the New Bar Control dialog, make sure the BarManager.HostContainerControl property has been assigned. This option will also be disabled if a MenuBar has already been added to the BarManager.
Create a DockableToolBar
To create a DockableToolBar:
- If not already open, start customize mode to open the Customize dialog.
- Select the Toolbars & Menus tab.
- Click the New... button to display the New Bar Control dialog.
- Enter a Name for the new control, e.g., Standard.
- Select DockableToolBar for the Bar control type.
- Click OK.
The toolbar should now be visible in the designer, but it has no command links in it.
Create a PopupMenu
To create a PopupMenu:
- If not already open, start customize mode to open the Customize dialog.
- Select the Toolbars & Menus tab.
- Click the New... button to display the New Bar Control dialog.
- Enter a Name for the new control, e.g., Popup.
- Select PopupMenu for the Bar control type.
- Click OK.
A popup menu will not be visible in the designer.
Add Command Links to Bar Controls

To add command links to a bar control, the desired bar control must first be selected:
- If not already open, start customize mode to open the Customize dialog.
- Select the Links tab.
- Select the Menu bar, Dockable toolbar, Popup menu, or Stand-alone toolbar radio button which corresponds to the type of bar control to be customized.
- Select the bar control from the corresponding drop-down list.
- The Preview list will display the command links for the selected bar control.
Tip
When a bar control is selected on the Toolbars & Menus tab, either click the Show Links button or double-click the bar control in the list to jump to the Links tab with the same bar control pre-selected.

To add command links to bar controls:
- Click the Add Command... button to open the Add Command dialog.
- Select a command in the Commands list.
- Click OK to create a link to the selected command and close the Add Command dialog.
- Repeat the above steps the add additional command links, as necessary.
Tip
If you chose to create the standard commands in the Create Commands step, the bar control can be easily set up by clicking the Add Standard button. The commands added will vary based on the type of bar control.
The command link provides a user interface instance for the command that was dragged. See the Commands and Command Links Overview topic for more information on the distinction between commands and command links.
New command links are added after any command link already selected in the Preview list or will be added at the end if there is no selection. Click the Move Up and Move Down buttons, as needed, to change the position of a selected command link after if it inserted.
Customize Command Links
The Links tab of the Customize dialog is used to customize all command links. Every bar control has a collection of command links, and popup command links (e.g., BarPopupButtonLink or BarSplitButtonLink) also have their own child links.
The top section of the Links tab is used to select which collection of links will be customized, where each bar control type has its own drop-down of selections. For each drop-down, bar controls are listed by name. Child popup links are listed by their hierarchy with a vertical bar (|) separating the name of a parent from the name of a child. Since there is only one menubar allowed, the primary links on a menubar will omit the parent menubar identifier when displayed in the drop-down list.
For example, a New popup link on a dockable toolbar named "Standard" will be displayed as Standard | New. The same New popup link under the File menu of a menubar will be listed as File | New instead of MenuBar | File | New.
To customize a command link:
- If not already open, start customize mode to open the Customize dialog.
- Select the Links tab.
- Select the Menu bar, Dockable toolbar, Popup menu, or Stand-alone toolbar radio button which corresponds to the type of bar control to be customized.
- Select the bar control or popup link from the corresponding drop-down list.
- In the Preview list, select the command link to be customized.
- Use the Properties grid or available command buttons to modify the properties of the command link.
Tip
- Click the Show Links button to quickly customize the child links of the selected command link (for popup command links).
- Click the Show Command button to jump to the command on the Commands tab which owns the selected command link.
- Double-clicking a command link in the Preview list will perform the Show Links action for popup command links, otherwise the Show Command action is performed.
Save Backup Layout
Important
Since the Visual Studio designer has been known to be buggy (with or without Actipro controls), saving a layout to a file is strongly encouraged!
Many hours can be spent building complex layouts, so exporting a layout can help recover that effort in the event of designer serialization problem or even accidental changes.
To save a backup of the layout:
- If it is open, close the Customize dialog to stop the design-time customize mode and ensure all changes have been committed.
- In the Visual Studio designer, right-click on the BarManager component to open a context menu.
- Select Save Layout to File....
- When prompted, select an XML file where the layout will be saved.
The complete layout stores all data about the commands, managed bar controls, and command links. This file can be used with the Load Layout from File... designer action to completely restore the layout.