Designer Support
The Dock controls provide design-time support, making it easy to configure the docking layout in the Visual Studio designer. After you drop a DockManager component on a designer Form from the Toolbox, the first thing to do is set the HostContainerControl. This is the control that will act as the hosting container for the docking system. This control may be a Form or any other type of container control. Typically, it is the parent Form.
Tool window layouts created in the designer are persisted to code. When the application is run, the layout is restored just as it was designed in the designer.
Note
See the Visual Studio Designer topic for details and requirements for designer functionality.
Creating a Tool Window for a Control
During design-time, you can create a tool window for a control:
- Select the control in the designer.
- Select the Dock in New ToolWindow action from the control's Smart Tag panel.
A new tool window will be created and docked to the host container control and the originally selected control will be set as the child control for the new tool window.
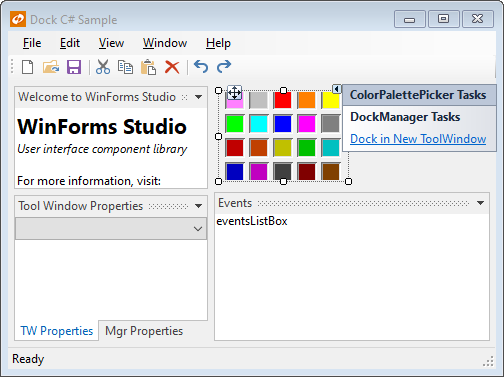
Dock control in the designer with an on the ColorPicker Smart Tags panel
Tip
The same Dock in New ToolWindow action is also available as a designer verb on the context menu of a control when working with .NET Core or .NET 5 and higher.
Creating a Blank Tool Window
To create a blank tool window:
- Select the DockManager component.
- Select the Create Tool Window action from the component's Smart Tag panel.
A blank tool window will be created that is docked in the host container control. The tool window is a container control, so other child controls such as textboxes can be added to it in the designer.
Tip
The same Create Tool Window action is also available as a designer verb on the context menu of a DockManager component when working with .NET Core or .NET 5 and higher.
Moving Tool Windows
The tool windows can be moved around within the container form via drag and drop or attached to other tool windows.
Removing Tool Windows
To remove a tool window:
- Select the ToolWindow in the designer by clicking on its title bar or selecting it in the Visual Studio Properties window.
- Select the Remove ToolWindow action from the tool window's Smart Tag panel.
When a tool window is removed, any child controls will be reparented to the host container control.
Tip
The same Remove ToolWindow action is also available as a designer verb on a context menu displayed by right-clicking on the title bar of a tool window.
The Tool Windows dialog, discussed below, can also be used to remove a tool window.
States Supported
Tool windows support an inactive state, docked state, and an auto-hide state in the designer. At this time, the tabbed document and floating tool window states cannot be designed. However, they can be programmatically set at run-time and run-time tool window layouts can save and restore any tool window state.
Using the Tool Windows Dialog
To open to Tool Windows dialog:
- Select a DockManager component or ToolWindow control in the designer.
- Select the Tool Windows... action from the Smart Tag panel to open the Tool Windows dialog.
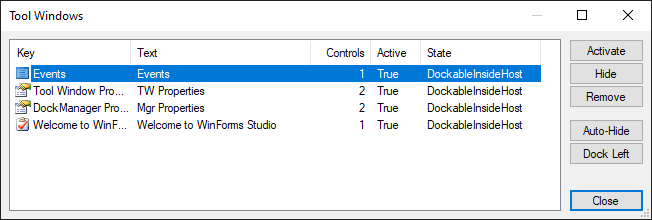
Tool Windows dialog, available from the "Tool Windows..." designer action
Tip
Double-click a DockManager component to quickly open the Tool Windows dialog using the default designer action for the component.
The same Tool Windows... action is also available as a designer verb on the context menu of a DockManager component or ToolWindow control when working with .NET Core or .NET 5 and higher.
The Tool Windows dialog lists all of the tool windows currently being managed by the DockManager component.
This table describes the buttons on the dialog:
| Button | Description |
|---|---|
Activate |
Activates (makes visible) the selected tool window. |
Hide |
Hides the selected tool window. |
Remove |
Removes the selected tool window and moves all of its child controls to be parented to the host container control. |
Auto-Hide |
Changes the selected tool window so that it is active in auto-hide mode. |
Dock Left |
Docks the selected tool window by itself on the left side of the host container control. |
Close |
Closes the dialog. |
Designing DocumentWindow and ToolWindow Instances
Dock supports another method of designing document and tool windows. The DocumentWindow and ToolWindow classes support instances being designed directly in the Visual Studio designer. This means you can create a class in your project that inherits one of those classes. Once saved, it can be opened just like you would open a Form or UserControl. You can design it in the Visual Studio designer and then at run-time, use code to create instances of your class. This is ideal for document windows where the same UI is replicated for each document that is opened.