Interior and Exterior Pages
There are two basic types of wizard pages: exterior and interior.
Exterior Pages
Exterior pages generally only come at the beginning and end of the wizard. They are termed Welcome Pages and Completion Pages, respectively. They fill the client area of the wizard, except for the caption and the band at the bottom that contains the Back, Next, and Cancel buttons.
The Wizard control allows you to create custom exterior pages. It also includes a template for creating Welcome Pages.
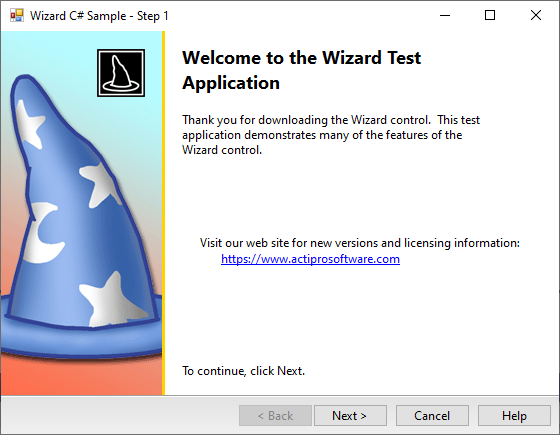
To create a Welcome Page like the one shown above, simply right-click on the Wizard control in the Visual Studio designer and select the Add Welcome Page action. The Wizard97 specification for Welcome Pages calls for a watermark bitmap to be added to the left side of the page. A smaller image is also added to the upper right region of the watermark area. By altering the various watermark properties of the renderer and/or Welcome Page, you can completely alter the appearance of the watermark area. You can place other page controls in the area to the right of the watermark.
On Welcome Pages, two Label controls should be placed in the area right of the watermark area. The upper one displays the title of the wizard and is rendered in a large bold font. A second Label, providing an extended description of the wizard appears below it, using the standard dialog font. These labels are automatically added to the page when it is first created in design-mode. You can modify them like any other Label by selecting one and using the Visual Studio Properties window.
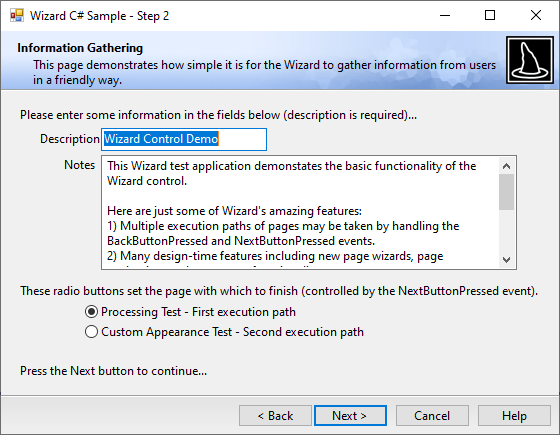
Interior Pages
All other pages in the wizard are interior pages. Interior pages have a header bar that stretches across the top of the wizard. This header bar is not part of the page itself, although the PageCaption and PageDescription properties may be set to control the text that is displayed in the header. The header's background and icon may be set in properties of the renderer and/or the WizardPage control.